add

About Me

My photo
Oracle Apps - Techno Functional consultant

Tuesday, August 30

Useful UNIX Commands

1). To find the top 10 larger files in the Directory,

$ls -lrt | awk '{print $5,$9}' | sort -nr head | xargs ls -lrt

2) To find the access and Modification details of a file

$istat

*This command is available for AIX only

3).To remove file which are older then say 7 days

$find . -mtime +7 -exec rm {} \;

4). Locate Files that Contain Certain Strings

$ find . -print | xargs grep -i v\$dba_objects

5) To Delete top 10 huge files in directory,

Use,

$du -sk | sort -nr | head | awk '{print $2}' | xargs rm -r

Making field as mandatory using Forms Personalization


Note : this example has been taken from "http://easyoracleapps.blogspot.com/search/label/Forms%20Personalization"

For quite some time I was thinking about publishing an article about forms personalization in Oracle HRMS.
The Metalink note on Forms Personalization is helpful, but what it lacks is a pictorial approach to implementing
Forms Personalizations. I am a visual animal, so I like to explain in that manner too.

My first article in the series of Forms Personalization is in response to a question raised in Oracle Forum under Oracle Human Resources (HRMS ). As per the Oracle forum request, If the Person Type is Employee, their clients wants Person Title field to become Mandatory ( lets assume it is the title field for now).  When the Person Type field changes to a value that is anything but Employee, the person title field should then toggle back to become optional.

Please note that when Person type Employee is selected, value in field
PERSON.D_PTU_USER_PERSON_TYPE  is assigned a value of “Employee”

Now the requirement is that for “Employee” field PERSON.D_TITLE must be made mandatory.

There are two possible ways the Person Type can change.
Either by picking a dropdown list of Action (e.g. Create Employee) or by directly picking up a value from LOV on field “Person Type for Action”. Whenever the person type changes, WHEN-NEW-ITEM-INSTANCE is fired for one for the below fields(depending upon how its changed).  Hence forms personalization must check conditions for below three fields
PERWSHRG.PERSON.PTU_ACTION_TYPE
PERWSHRG.PERSON.D_PTU_USER_PERSON_TYPE
PERWSHRG.PERSON.SHOW_NUMBER

The demo below contains conditional check on “WHEN-NEW-ITEM-INSTANCE” of PERSON.PTU_ACTION_TYPE

When implementing this, you will have to replicate the steps in the demo for WNII on both PERWSHRG.PERSON.D_PTU_USER_PERSON_TYPE & PERWSHRG.PERSON.SHOW_NUMBER

I have tested the steps below myself, and they appear to work.

OK, here we go.....

STEP 1
Create Personalization as below( to make Title field mandatory)
Sequence: 50
Description: Make Person Title Mandatory when Person Type is Employee.
Trigger Event: WHEN-NEW-ITEM-INSTANCE
Trigger Object: PERSON.PTU_ACTION_TYPE
Condition: ${item.person.d_ptu_user_person_type.value} = 'Employee
Check if Person Type is Employee in When New Item Instance


Action Sequence: 10
Action Type: Property
Action Object Type: Item
Action Target Object: PERSON.D_TITLE
Action Property Name: REQUIRED
Action Value: TRUE
Make Title mandatory when Person Type is Employee


STEP 2
Create another Personalization as below ( to make Title field Optional)
Sequence: 51
Description: Make Person Title Mandatory when Person Type is Employee.
Trigger Event: WHEN-NEW-ITEM-INSTANCE
Trigger Object: PERSON.PTU_ACTION_TYPE
Condition: NVL(${item.person.d_ptu_user_person_type.value},'xxyyzz') != 'Employee'
Check if Person Type is anything other than Employee in When New Item Instance
 

Action Sequence: 10
Action Type: Property
Action Object Type: Item
Action Target Object: PERSON.D_TITLE
Action Property Name: REQUIRED
Action Value: FALSE
Make Title option when Person Type is not Employee

Monday, August 29

Currently held locks per concurrent request

select /*+ ordered */

fcr.request_id

, object_name

, object_type

, decode( l.block

, 0, 'Not Blocking'

, 1, 'Blocking'

, 2, 'Global'

) status

, decode( v.locked_mode

, 0, 'None'

, 1, 'Null'

, 2, 'Row-S (SS)'

, 3, 'Row-X (SX)'

, 4, 'Share'

, 5, 'S/Row-X (SSX)'

, 6, 'Exclusive'

, to_char(lmode)

) mode_held

from apps.fnd_concurrent_requests fcr

, gv$process pro

, gv$session sess

, gv$locked_object v

, gv$lock l

, dba_objects d

where fcr.phase_code = 'R'

and fcr.oracle_process_id = pro.spid (+)

and pro.addr = sess.paddr (+)

and sess.sid = v.session_id (+)

and v.object_id = d.object_id (+)

and v.object_id = l.id1 (+)

;

Track and Trace E-Business Suite Concurrent Request - EBS Logs, O/S Process IDs, Locks

select /*+ ordered */

fcp.user_concurrent_program_name

, fcr.request_id

, round(24*60*( sysdate - actual_start_date )) elapsed

, fu.user_name

, fcr.oracle_process_id

, sess.sid

, sess.serial#

, inst.inst_name

, sa.sql_text

, cp.plsql_dir || '/' || cp.plsql_out outfile_tmp

, cp.plsql_dir || '/' || cp.plsql_log logfile_tmp

from apps.fnd_concurrent_requests fcr

, apps.fnd_concurrent_programs_tl fcp

, apps.fnd_concurrent_processes cp

, apps.fnd_user fu

, gv$process pro

, gv$session sess

, gv$sqlarea sa

, sys.v_$active_instances inst

where fcp.concurrent_program_id = fcr.concurrent_program_id

and fcp.application_id = fcr.program_application_id

and fcr.controlling_manager = cp.concurrent_process_id

and fcr.requested_by = fu.user_id (+)

and fcr.oracle_process_id = pro.spid (+)

and pro.addr = sess.paddr (+)

and sess.sql_address = sa.address (+)

and sess.sql_hash_value = sa.hash_value (+)

and sess.inst_id = inst.inst_number (+)

and fcr.phase_code = 'R' /* only running requests */

;


From the above we can see key information:

The running Concurrent Request Program Name and Request_ID

The database node operating system process id (OSPID) so we can monitor usage via top / iostat / vmstat

The SID / Serial in case we want to kill the session via alter system kill session '130,29699';

The instance name the database session is running on in a RAC environment

The currently running SQL text

The temporary files where concurrent request log/out is being written to via utl_file while running. These files are copied over to the Concurrent Tier $APPLCSF/$APPLOUT and $APPLLOG after completion of the request.

Sunday, August 28

Form Personalization Submit Request Delivery Options Button – Removing the Button

Forms Personalization to make the button disappear. Note that this could double as a tutorial on how to remove a button using Forms Personalization as well.

Step 1: Fire up the Submit Request Form and go to Help->Diagnostics->Custom Code->Personalize. If this menu item is not available or if you get a ‘Function not available to this responsibility’, check out the profile values ‘Hide Diagnostics menu entry’ and ‘Utilities:Diagnostics’.

Step 2: You’ll notice that the Personalization form comes up behind the Submit Request Form. You’ll also notice that you are unable to click on it to bring it to the foreground!

Odd behavior, but it is what it is. To get access to the form, hit cancel on the submit request form and back all the way out to the main menu screen. The Personalization Form will be behind the main menu and accessible to bring to the foreground.

Step 3: You want to set up a Form Level Personalization on a ‘WHEN-NEW-FORM-INSTANCE’ trigger. So, set:

Seq: 10

Description: Any description

Level: Form

Trigger Event: WHEN-NEW-FORM-INSTANCE

Step 4: Switch the Actions tab and this is where we set the DISPLAYED property of the button to false, effectively removing it from the canvas:

Set the following values:

Seq: 10

Type: Property

Description: Disable Delivery Options Button

Object Type: Item

Target Object: WORK_ORDER.DELIVERY

Property Name: DISPLAYED (APPLICATIONS COVER)

Value: FALSE

Step 5: Save your work and check it out, no more Delivery Options button.


Debugging Advanced Collections Concurrent Programs

1. Set the profile value: “IEX: Debug Level” to a value lower than 20.

2. Turn on Statement Level logging for your user at the IEX module level. To do this, follow these steps:

  • As System Administrator navigate to Help -> Diagnostics -> Logging -> Preferences
  • Add a new user to the list (your user), enable logging, set the level to 1-Statement and set the module to iex%.
  • Turning on Debug in EBS R12

    ** Remember that when you are done to come back here and turn off logging. Failure to do so may result in performance problems and a full file system which will not make you very popular with your colleagues. **

    3. Run the concurrent request IEX: Send Dunnings for Deliquent Customers

    Now, on the backend file system you will have a file named _.IEX. This file will be located in the first directory that is returned for the value of UTL_FILE_DIR (select * from v$parameter where name = ‘utl_file_dir’;). In my case it was in /usr/tmp.

    If you’re interested, all logging for IEX is funneled through the package IEX_DEBUG_PUB. I would imagine that other Collections processes follow this same model.

    Designing Simple Master/Deatil Oracle workflow

    When you spawn a detail process from a master process in Oracle Workflow, you are

    in effect creating a separate process with its own unique item type and item key. Oracle Workflow engine has provided an API SetItemParent API” to define a master/detail relationship between the two processess. This APIshould be called after we called the CreateProcess API for the DETAIL process, BUT before a call has made toStartprocess API for detail process.


    In the workflow we have two activities (one will be define in master and other in detail) to coordinate flow between master and detail process. As explained below,

    One activity lets you pause a process and the other signals the halted process to continue. To use these activities, you place one activity in the master process and the other in each detail process.


    These activities are

    1. Wait for Flow Activity
    2. Continue Flow Activity
    Both activities contain two activity attributes that you use to identify the coordinating

    activity in the other process(es).


    Wait for Flow Activity – This activity can be in master /Detail and will pause the flow until the corresponding detail/master process completes for this activity. pl/sql procedure for Wait for Flow activity isWF_STANDARD.WAITFORFLOW.

    Based on our business requirements we can have any number of Wait for Flow activities in the same workflowprocess.One very Important thing that should be keep in consideration when we design Mater /Detail relationship, If we have ONE master and ONE detail process, but MASTER process wait for the DETAIL process at multiple stages of its (master) flow, in that case master process should have separate Wait for Flow activity node for each time it wait for detail process. Similarly DETAIL process should have separate Continue Flow Activity corresponding to each Wait for Flow activity in Master process.


    Wait for Flow activity contains 2 activity level attributes


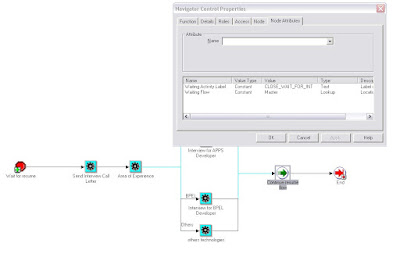
    Continuation Flow - specify whether this activity is waiting for a corresponding

    "Master" or "Detail" process to complete.
  • Continuation Activity - specify the label of the activity node that must complete in

    the corresponding process before the current process continues. The default value isCONTINUEFLOW.
  • Continue Flow Activity


    Use this activity to mark the position in the corresponding detail or master process

    where, upon completion, you want the halted process to continue. This activity calls a

    PL/SQL procedure named WF_STANDARD.CONTINUEFLOW.

    When a Continue Flow activity is executed, the WF_STANDARD.CONTINUEFLOW

    procedure checks whether the corresponding Wait for Flow activity is associated with

    any other processes that have not yet completed their Continue Flow activities. If so, the

    waiting process keeps waiting for those other processes. If the Wait for Flow activity

    is not waiting for any other processes, then the WF_STANDARD.CONTINUEFLOW

    procedure completes the Wait for Flow activity so that the process that was waiting

    now continues to the next activity.


    Activity Attributes

    The Continue Flow activity contains two activity attributes:

    1. Waiting Flow - specify whether the halted process that is waiting for this activity to

      complete is a "Master" or "Detail" flow.
    2. Waiting Activity - specify the label of the activity node in the halted process that

      is waiting for this activity to complete.
    Below is example for how to call the master/detail workflow from pl/sql


    Master Workflow (Calling Detail Flow with "Waiting Activity Label = Name of Child Activity waiting for this master to complete)


    Master Workflow (received call from Detail activity with Continutation Activity Label = Name of Child Activity, that this Master is waiting in Order to progress further.)


    Detail Flow (Received Call from master flow with "Continutation Activity Label = Name of Parent Activity that this Detail is waiting in Order to progress further)


    Detail Workflow (Calling master flow with "Waiting Activity Label = Name of Parent Activity Waiting for this Child activity to complete)


    declare

    l_ckey varchar2(10) :='615';

    l_pkey varchar2(10) :=l_key; --(can be any value)

    l_ptype varchar2(10) :='SR_TYPE'; -- Parent type

    l_ctype varchar2(10) :=’SR_INTER’; -- Child type

    l_pprocess varchar2(100) := 'SR_PROCESS'; -- Parent process

    l_cprocess varchar2(100) := 'SR_INT_PROCESS'; -- Child process

    l_url varchar2(300);

    begin

    wf_engine.createprocess(l_ptype,l_pkey, l_pprocess,NULL,NULL);

    wf_engine.createprocess(l_ctype,l_pkey, , l_cprocess,NULL,NULL);

    wf_engine.SetItemParent(l_ctype,l_ckey,l_ptype,l_pkey,NULL,TRUE);

    wf_engine.startprocess(l_ptype,l_pkey);

    wf_engine.startprocess(l_ctype,l_ckey);


    l_url:=wf_engine.getitemAttrText(l_ptype,l_pkey,'RECEIVER',TRUE);

    dbms_output.put_line(l_url);


    end;

    Oracle Workflow - Concept

    This topic explains in short about the key features of Oracle workflow and how to create one simple workflow.


    This blog is for the developer who are new to the workflow or developer who want to learn workflow. I have divided the workflow in 3 blogs.

    In First part, I will talk about the Workflow and it’s components Other than Business Events.

    In Second Part, I will explain the Business events in depth.

    In Third Part , I will explain how to send Email Notification from workflow.


    Oracle workflow is tool to automate the process with in/out of organization. It helps us to sequence the business activities of our business as per requirements/poloicies and business rules. An business activitiy inturns can be a

    1. Business event
    2. notification
    3. function or
    4. another subprocess.

    It helps us to

    1. Save time in doing repetative work.
    2. Send Notification /reminder of the work to done.

    Nature of workflow is that I will go as far as it can go, ie once we start a workflow it will keep executing the activities in it’s route unless it encounter a Block/Notification activity that requires Input from Human/some external process


    Important Components of Workflow

    Workflow Builder – It is a client tool, you can downlaod it from the http://www.oracle.com/. This is a graphical tool that helps us to create /modify the Business flow.

    Workfow Engine - The Workflow Engine embedded in the Oracle Database implements process definitions at runtime. The Workflow Engine monitors workflow states and coordinates the routing of activities for a process. Changes in workflow state, such as the completion of workflow activities, are signaled to the engine via a PL/SQL API or a Java API. Based on flexibly-defined workflow rules, the engine determines which activities are eligible to run, and then runs them.


    Workflow Process – A workflow process is nothing but the sequence of our business flow designed with the workflow tool. It may consists of activities in the business process, relation shipbetween the activities, subprocesses etc. An activity can be a pl/sql or Java function or a Manual function like notification that may /may not required some interventions.


    A workflow business process begins with a Start activity and completes with a End activity. Between Start and end there can have a

    Pl/sql function for some automated process,

    A block function in case we want some external function to process the work or

    A notification in case worflow want user of the workflow to complete the some activity.


    Worflow supports

    1. Looping between acativities.
    2. Parallel/Sequencial flows.
    3. Timeout of activity.
    4. Subprocess.
    5. Braching of the flow based on the result of an activity..

    Desiging of Workflow Process

    Oracle workflow builder help us to design workflow for our business Process.Workflow builder provide us a tree like structure that consists of

    1. Attributes.
    2. Process.
    3. Notifications.
    4. Functions.
    5. Events .
    6. Messages and Lookup type etc.

    Oracle workflow builder has lot of Standard activitites that we can use in our process by just draging and droping from thr Standad (built –in) workflow. These standard activities, attributes, lookuptypes are associated with Standard Workflow (wfstd.wft). Some of the standard activities are AND/OR/WAIT/BLOCK etc .We can use any of these based on our requirement.


    Before we begin with the workflow in bulider, it is always good practice to design the flow on pen/paper, Plan for

    All the activities, notications, functions, events in the flow.

    Out come of all the above

    What action need to be taken based in the outcome


    In this blog I will explain Top – Down approch to design a workflow (In Top Down approch design process diagram with activities, and then design the underline code for each activity)

    Following are steps

    1. Use workflow quick wizard to create Item Type and Process activity.
    2. Define Function, Notifications, relationship between activities.(Without specifying the underline code).
    3. Define Item type attributes, lookuo type/code
    4. Define Messager and message attribute.

    Each of Item Type, Process, Function etc has there Internal and Display name, Description, Underlying pl/sql or Java code etc.


    Important Properties

    1. Item Type [Selector OR Callback] - One of the important property of the ItemType is Selector OR Callback function. This is a PL/Sql function that workflow engine can call to Reset or Test Context information for an item type before executing an activity.An itemtype can have multiple WF processess associated with it, this Selector/Callback function help to identify the appropriate process to run.
    2. Process [Runnable] – Select the runnable check box if process is a top-level workflow process (one that can be initated and not a subprocess).

    Attributes

    Attribuet are just like variables.We can deine attribute at the ITEM TYPE as well at the message , notification , lookuptype.Only difference is attribute at the itemtype level act like global variables.

    For different type of attribibute please refere user guide


    Notification

    It is an activity to communicate with human being sand it may or may not require response. (TIMEOUT – Indicate wethere nitifiucaton respopnse received by certain time).


    Message

    It is information that sent by notification.


    Function

    A function activity is usually defined by PL/Sql store procedure. Important thing here is PL/SQL procedure for function activity must follow a standard API.Any Pl/sql function called from the workflow API should have following Parameter.


    procedure do_nothing

    ( itemtype in varchar2,

    itemkey in varchar2,

    actid in number,

    funcmode in varchar2,

    resultout in out varchar2 )


    Property Page – We can define the property for activity/function/notification etc in the property page. I am explaining only few.


    In detail tab of Property Page you can define an error process (Error Item Type) for the activity, to handle any unexected errors encountered during the execution of workflow. By defualt Workflow will add WFEROR, but in case you want to define your own process then you can add your error process name here. Another Important column on this tab is On Revisit, It determine how the Workflow Engine handles this

    Activity when it is transitioned to more than once.

    It has following Choices.

    Ignore - Workflow Engine executes the activity only once, and ignores the activity for all subsequent revisits.

    Reset - Workflow Engine resets the completed activities by executing each activity in CANCEL mode before executing them in RUN Mode.

    Loop - Workflow Engine simply reexecutes the activities without Reseting them.


    Transition

    Every process must have a Start and End activity. Once activities are ready we can design the transition between activities/process.


    Validation /Verification of Workflow Process

    One Workflow process is complete, we can validate /verify the process for Errors.During verification workflow valiadate .

    1. Process Contain at least on start and one end.
    2. One subprocess sould not used twice.
    3. All possible activity results are modled as outgoing transitions.
    4. An End node should not have any outgoing transitions.
    5. For a notification activity, its result type should match with the lookup type defined in the underline message’s RESULT attribute.All message attribute refered in the message should exist.

    Define a Document Type Attribute in Oracle workflow

    Document Type attribute is a very good feature Offered in Oracle Workflow.


    Document Type has many more uses but here I will explain how to call pl/sql API from a workflow attribute with Document Type.


    This feature is very helpful when there is requirement to call pl/sql package from workflow without adding a NEW ACTIVITY.In case just add an attribute in workflow and then call pl/sql package from attribute.


    DOCUMENT TYPE ATTRIBUTE

    You can integrate a document into a workflow process by defining an attribute of type document for an item type, message, or activity. Oracle Workflow supports document types called "PL/SQL" documents, "PL/SQL CLOB" documents, and "PL/SQL BLOB"documents. A PL/SQL document represents data as a character string.


    The document-type

    attribute tells Oracle Workflow how to construct a dynamic call to a PL/SQL procedure that generates the document. You can embed a

    PL/SQL or PL/SQL CLOB document-type message attribute in a message body to display the document in a notification.


    The PL/SQL procedure that generates a PL/SQL document must have the following standard API as shown below

    ------------------

    procedure_name

    (document_id in varchar2,

    display_type in varchar2,

    document in out nocopy varchar2,

    document_type in out nocopy varchar2)

    ------------------


    whenever you want to use document type , the corresponding procedure should have above 4 Parameters.


    document_id - A string that uniquely identifies a document. I always used ITEM_TYPE value .But value can be anything that uniquely identifed the document and depend on requirement to requirement.


    Please Refere Workflow Developer Guide from Oracle Development For More details.

    OR REFER my example Below


    display_type - It has value like

    text/plain

    text/html


    document

    The outbound text buffer where up to 32K of document text is returned.

    document_type

    The outbound text buffer where the document content type is returned. Also referred to as the returned type.


    I will explain how to use document type in workflow with the example.


    In my example , I will define a pl/sql API , and then will define a workflow and will call the pl/sql API from the workflow attribute (Attribute will be of type DOCUMENT).


    1.Define pl/sql Package & procedure

    2.Design workflow and Workflow Attribute of type document type

    3.call the pl/sql API from the document type ATTRIBUTE.


    PL/SQL package

    ------------------

    create or replace package testpkg as

    procedure testproc1

    (document_id in varchar2,

    display_type in varchar2,

    document in out nocopy varchar2,

    document_type in out nocopy varchar2);


    procedure testproc2

    (item_type in varchar2,

    item_key in varchar2,

    activity_id in number,

    command in varchar2,

    resultout in out varchar2);

    end testpkg;

    =============


    create or replace package body testpkg as

    procedure testproc1

    (

    document_id in varchar2,

    display_type in varchar2,

    document in out nocopy varchar2,

    document_type in out nocopy varchar2) as

    begin


    document_type:='text/plain';

    document :='Mytest value'; - you can build your logic and then populate value to this variable

    end testproc1;


    procedure testproc2

    (item_type in varchar2,

    item_key in varchar2,

    activity_id in number,

    command in varchar2,

    resultout in out varchar2)

    IS

    begin

    insert into test001 values ('BBB');

    resultout := 'COMPLETE';

    end;

    end testpkg;

    -----------------------------


    My Workflow


    Document Type Attribute - Attribute SRA1 is of type DOCUMENT .


    As shown above

    Default Type for Attribute SRA1 is Constant and

    Default Value for Attribute SRA1 is plsql:package_name.procedure_name/&Attribute_name.


    IMPORTANT - Please Note that the Attribute in

    should be of format plsql:/

    where

    is pl/sql API (package_name.procedure_name)

    -Any PL/SQL argument string that you want to pass directly to the procedure


    From workflow point of view to make things easy I always prefer to pass values of the unique Attribute of workflow.


    Please Note that in my example I have ITEMKEY as one of the attribute in my workflow and that has unique value.

    BUT IF in your case there is no importance of the UNIQUE value, then you can even replace with a HARD CODED Constant value.

    Other options to add a unique value are &#NID(Notification_id).

    Oracle R12 Internal Requisition and Internal Sales Order Process Flow

    Process flow and Setup required to create Oracle Order Management Internal Sales order (ISO) from Internal requisition (IR)

    What is internal sales order
    A request within your company for goods or services. An internal sales order originates
    from an employee or from another process as a requisition, such as inventory or
    manufacturing, and becomes an internal sales order when the information is transferred
    from Purchasing to Order Management. Also known as internal requisition or purchase
    requisition.

    Oracle Purchasing uses Order Import to transfer requisitions for internally sourced
    products to Order Management. Once imported, the internal sales orders are processed
    similar to regular sales orders.

    Note: You can create requisitions (with same number) in two different operating units.

    You can partially or fully cancel the line quantities on internal sales orders.
    You can make the following attribute changes after an internal sales order has been generated:
    Update Scheduled Shipment Date
    Decrement order line quantity
    Note: If you cancel an internal sales order, order line, or backordered order line that is linked to an internal requisition, manually cancel the internal requisition. The order cancelProcessing issues a reminder.

    Test Case –
    Item – IR Item004
    Assign to Inventory Org M1 and M2
    Create Requisition with Destination Org M1 and Source Org M2.Create Internal Sales Order in M2

    1# Create Item IR Item4 , with “Purchased Item” as template , in Oracle Inventory Management.


    2# Mark Item as Internal Order Enabled.


    3# Assign Item to M1 and M2 Inventory Orgs.


    4# Define Cost for Item Navigation >Costs >Item Costs


    5# Update the cost
    Navigation
    Costs
    Update Standard Costs
    Update Cost


    6# Set the Internal Order Setup at Customer Ship To Site in Oracle Order Management.


    7# Define Shipping Network setup Between M2 and M2 in Oracle Shipping.
    Inventory > Setup > Organization > shipping Network


    8# Define Purchasing Option Setup for Internal Sales Order and define
    Internal requisition Order Type
    Internal requisition Order Source.
    in Oracle Purchasing Module


    9#Create & Approve Requisition in Oracle Purchasing


    Save and Approve Requisition.


    10#submit “Create Internal Order” Concurrent program in Oracle Purchasing.


    11#Submit Order Import


    Query for Sales Order based on requisition Number.


    12# Progress the Sales Order from Awaiting Shipping to Close.